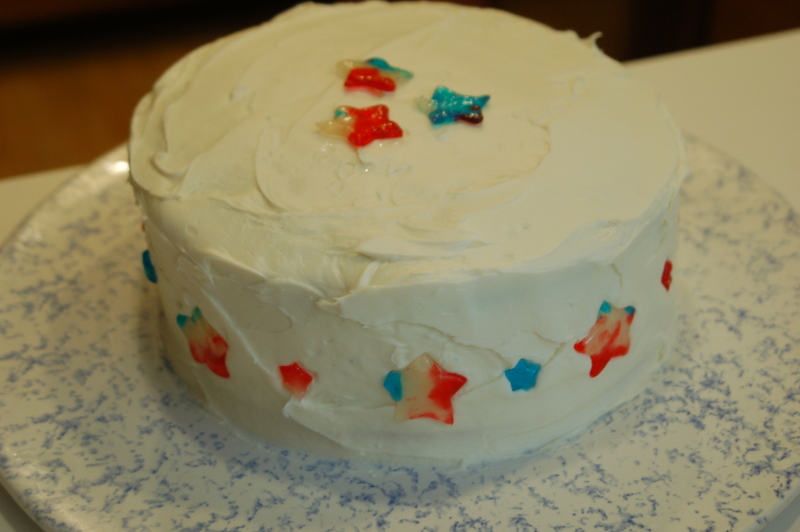
Happy 4th of July everyone! I made this cake for my family's 4th of July BBQ on Friday and it seemed like a big hit! Its not everyday that you see an American Flag inside a cake ;) Unfortunately, I was so eager to serve it that I didn't get a ton of good pictures of the end product, but these will do!
This cake seems like it would be complicated, but with the right tools it was totally easy to make. My sister showed me the recipe from
Glorious Treats.
You need..
- 2 white cake mixes
- 2 round 8 inch cake pans
- one 4-5 inch round cookie cutter (mine was 4.5 and it was perfect)
- A cake leveler (seriously the most useful thing I have ever bought. It's about $4 from Michaels and I will use it on every cake I ever make from here on out. Also, this cake is almost impossible without it)
- blue and red food coloring
Start off by dying the first cake mix red. I used the classic supermarket food coloring for the "red" but it turned out pink. Next time I'll definitely use Wilton's more heavy duty food coloring.
One of my biggest helpful hints when making any cake is to cut cloth strips, soak them in ice water, and wrap the wet strips around the outside of the cake pan before baking. Secure the strips with a safety pin. This technique changes the heat patterns in the cake in the oven, so the cake comes out as level as it can naturally be. It saves you decorating disasters and it works every time!
Pop this in the oven and follow the baking instructions. Make sure you test the cakes with a toothpick before pulling them out of the oven! A toothpick that is inserted in the middle of a cake and comes out with crumbs signals an underdone cake which will crumble under the many layers of this cake.
Next make the second cake mix. This time, leave half of the mix white and dye the other half blue. I suggest pouring the batter into a measuring cup to be exact. Half of my batter ended up being a little over 2 cups. This time I used the Wilton food coloring and it made all the difference.
When the cakes are FULLY cooled, use the cake leveler to touch up any peaked or slanted tops. Do not level the blue cake; leave it untouched until the very end.
Then use the leveler to cut the two red cakes and the white cake in half horizontally.
Keep the blue cake whole!
You will find it easiest to move these thin layers around with a spatula. The fish spatula we have in our house was perfect.
Next, use the 4 inch cookie cutter to cut a hole in one red layer and one white layer. Keep the inner circle and discard the outside donut. Also discard one layer of red cake. I know wasting cake is so sad, but it can be devoured by onlookers or experimented with!
![]() |
| Hungry onlooker |
![]() |
| Sam's experimental baby cake |
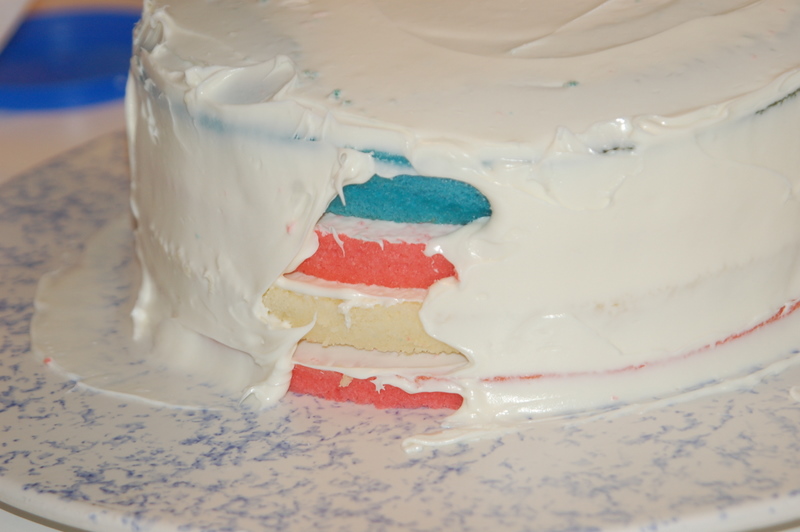
Now it's time to play with your blue cake; use the cookie cutter to cut a hole in the center of the full blue cake. Carefully remove the hole and discard - keep the donut shaped cake. Next, layer the white circle, then the red circle into the hole in the blue cake. Frost layers between the white and red circle. Now its time to level it.
Now start layering the cake on your final surface. Layer red, white, red, blue while lightly frosting between each layer. Then frost and you're done!
I tried to make candy stars to decorate the cake but they turned out to be more of a hassle than they were worth. I crushed Jolly Ranchers and Life Savers, positioned them in a red white and blue pattern on a baking sheet with parchment paper and stuck them in the oven at 350 for 3 minutes. I put potato nails on each side of the candy to keep it from flowing outward but I think they were pretty unnecessary.
Then I used star cookie cutters dipped in canola oil to cut star shapes. I attempted many methods, none of which were very successful so I do not recommend it. The best method was waiting about 30 seconds after pulling the candy out of the oven, then quickly pressing the cutters in and out of the melted candy, leaving star imprints in the candy. Then when the candy was completely cooled, I broke off the candy around the imprint to leave me with the star. The whole process was very frustrating and disappointing.
Have a happy 4th of July and enjoy your fireworks!